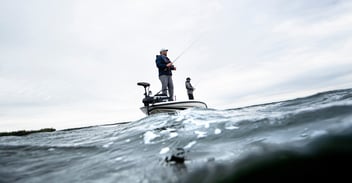
Inflatable life jackets are convenient for many reasons. Their lightweight design and large range of motion make them comfortable for fishing, sailing, boating and paddling, as they are less likely to get in your way. Bluestorm’s personal flotation devices (PFDs) are U.S. Coast Guard Approved and designed to exceed safety standards. In order to get the best use out of your PFD, it is crucial to know how to take care of it and maintain its safety abilities by understanding when you should replace the CO2 cylinder.
When to Re-arm the hardware in an inflatable life jacket
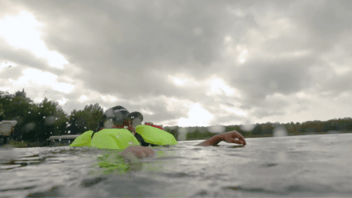
After your life jacket has inflated automatically while submerged in water, or after you’ve manually inflated it by pulling the cord, you’ll need to re-arm it before the next use. The best way to know if it’s time for a replacement re-arm kit is by checking the automatic service indicator, the bobbin, and the CO2 cartridge itself.
Checking The Automatic Service Indicator
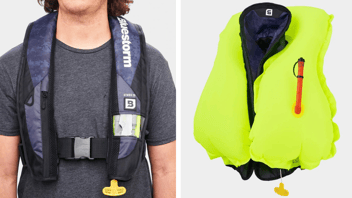
Use the visual inspection window as the primary way to check the status of the automatic service indicator. If the indicator is green, the life jacket will automatically inflate within seconds after being submerged in water. If the indicator is red, your hardware is likely compromised and you’ll need to purchase a new re-arming kit.
A good way to remember this is by referencing the phrase, “Green means go, red means no!”
*Note that Bluestorm inflatables use two different inflation mechanisms: the Stratus 35, Arcus 40, and Atmos 40 all use the same 1F mechanism which has a visual seal indication window on the front shell. The Cirrus 26 and Cirro 26 use a 6F inflation mechanism that is located within the jacket. The inflation mechanics are basically the same, but the service indicators look different and are in different locations.
Checking the Bobbin
The bobbin is the key to your inflatable doing its job upon immediate impact with the water. This water-soluble element is what dissolves when your life jacket is submerged, thus allowing the cartridge to fire and inflate the chamber or bladder.
To check the status of your bobbin, simply inspect it for any cracks or holes and confirm that it hasn’t expired. If the bobbin is expired or degraded it may not perform properly, and you’ll want to purchase a replacement right away.
Checking the CO2 Cylinder or Cartridge
You’ll need to know how often to replace a CO2 cylinder or cartridge which can be found in the owner’s manual or noted on the device itself. Inspect the CO2 cylinder for any holes and confirm that it hasn’t expired. If there’s a small hole on the bottom this will indicate that it has been used.
When preparing for an outing, ask yourself:
- Have I checked the status of the inflator and made sure that the CO2 cylinder is not punctured?
- Have I checked my inflatable PFD for leaks in the last two months?
- Do I have the right PFD for this activity?
- How does my PFD work in the water?
- Have I tested it this season?
- Do I have the right size PFD for each person (according to the label) and do they fit snugly?
- Have I checked my other inflatable PFDs in the same manner in which I checked my own?
How to Re-Arm a CO2 Cartridge for an Inflatable Life Jacket
Now that you know the basics of how often you should replace the CO2 cartridge in a PFD, you can begin the process of replacement.

Step 01: Remove all air from the chamber.
Locate the red oral inflation tube on the device where you would manually inflate it. Remove the black cap, invert it into the oral inflation tube, and hold it to release air. Squeeze or roll the inflated chamber until all of the air is expelled. Once the air has been expelled through the tube, replace the cap to its original position.

Step 02: Remove the cap and Discard the old cylinder and bobbin.
Locate the inflation mechanism that houses the bobbin and cylinder. On most of our vests, the inflation mechanism is easy to find and is located at the bottom of the inflation bladder on either the left or right side.
Remove the cap and discard the old cylinder and bobbin in the trash. Bobbins that have been exposed to high levels of humidity, heat, or vibration need to be inspected, removed, and replaced more frequently. Be sure to keep the original cap to re-install it after the process is finished.
Step 03: Get a new bobbin.
A good thing to remember is that the average shelf life for bobbins is three to five years depending on when you purchased your inflatable. That said, you should always inspect it between each use for cracks, breaks, or deteriorations that could prevent the life jacket from inflating. Purchase a new bobbin for your re-arm kit here.
*Note that Bluestorm inflatable life jackets purchased from 2019-2020 will require a replacement bobbin after three years. Models purchased from 2021 through today feature an upgraded bobbin that will last up to five years and is marked with an expiration date.

Step 04: Install a new bobbin and cap.
After you have disposed of the old bobbin, install the new bobbin from the re-arming kit into the gray housing. Before installing, make sure the white material in the new bobbin is not cracked or damaged. Also, be sure to check the expiration date and ensure that the bobbin has not expired. With the white facing up, drop the new bobbin into its housing after aligning it properly with the grooves.
Once the bobbin is dropped in the housing, re-install the cap and turn it clockwise until it meets the housing. There should be no gap between the housing and the cap.

Step 05: Make sure the new cylinder has not been punctured.
After the cap and bobbin are securely installed, take the new CO2 cylinder and ensure it’s not punctured or compromised.

Step 06: Install the new cylinder.
To install the new cylinder in its housing, turn it clockwise until snug, but do not overtighten If the cylinder is properly installed, the service indicator will show green.
*Note the Arcus 40 model will use a zipper enclosure.
Step 07: Re-pack the air chamber or bladder.
Fold both sides of the air chamber into the outer shell. As you fold the air chamber, make sure not to twist it. To close the air chamber securely, press the hook and loop together on the outside edge of the shell. Once all of the bladder is in the shell, recheck that the green service indicator is shown through the indicator window on the shell.
You have completed the recharging process! Before you go out on the water, make sure your PFD is armed and ready to go.
Get the Most Out of Your Inflatable PFD
Your inflatable life jacket can last you years with proper care and regular maintenance. To prepare for any emergency, practice wearing and adjusting your inflatable PFD in the water before heading out.
Bluestorm wants to make the most of your recreational activities by keeping you safe on land and in the water. Now that you know how to re-arm your inflatable life jacket from Bluestorm, check out our inflatable PFDs and rearming kits for additional security on the water, or contact Bluestorm with additional questions you may have.